Wednesday, April 30, 2014
Special chewra
Special chewra

Ingredients
- Rice puffs 2 cups
- Dried coconut thinly sliced 3 tbsp
- Roasted gram 3 tbsp
- Cashew nuts 15 to 20
- Peanuts 3 to 4 tbsp
- Potatoes straws 1 cup
- Tiny chips 1 cup
- Curry leaves few
- Dry red chilies 8
- Salt 1 tsp
- Chili powder 1 tsp heaped
- Turmeric ½ tsp
- Sugar 2 tbsp
- Oil for deep frying
Method
- Heat oil in a wok. Lower a strainer and fry the rice puffs.Gradually place on a kitchen napkin .Fry all the rest each separately in the strainer in the same way.
- Mix the rice puffs, dried coconut, roasted gram, cashew nuts, peanuts, potato straws, tiny chips, curry leaves, dry red chilies, salt , chili powder, turmeric and sugar .Allow the mixture to cool and fill in an air tight box will keep fresh and crisp for months.
Tuesday, April 29, 2014
Roasted Tomato Soup

A tomato soup recipe to cure all ills. Roasting is the secret.
When cabin fever hits, I am not a pretty sight. My hair has a static-inspired halo decidedly unholy. My chin breaks out (zits? At 53?). I pace and fidget. I am not the serene goddess you think I am.
I am itchy and creaky and sick to death of pilled winter sweaters- not to mention winter temperatures. You folks in Ohio? My thoughts are with you, Babycakes. Here in northern New Mexico I don't have much to kvetch about. But you? Oy. All that snow? It might crush me. Seriously. I'd be done.
So to celebrate the return of Daylight Saving (three weeks early, no less) I made a life affirming taste bud tingling pot of soup this weekend. See if this doesn't help quench your cabin fever.
Just a little.
Read more + get the recipe >>
Monday, April 28, 2014
Pork Chop in Port Wine Sauce

Carrabbas Pork Chops in Port Wine
Copycat Recipe
Serves 2
1-2 pork chops per person 3/4 inch thick
1 large apple Granny Smith or Red Delicious
salt and pepper
1 large onion, sliced thinly
3 garlic cloves
1/3 cup port wine
1/2 cup water
1 teaspoon freshly dried thyme
olive oil and a little butter
Sprinkle freshly cracked pepper on one side of pork chops and a little of the thyme and set aside on a plate. Slice onion thinly while skillet heats up on medium heat. Drizzle 1 tablespoon olive oil into hot skillet and add onions.Cook for 4-6 minutes, stirring frequently.While onions cooking, mince up garlic and set aside.Once onions are cooked and slightly browned, take out of skillet and put in bowl and set aside.
Cook the Chops: Put skillet back on heat, add a little olive oil and a teeny amount of butter and place your pork chops spiced side down into hot skillet. Cook 3 minutes on each side.If you chops are thicker than 3/4 inches, you will have to cook them longer. Chops are done when they have just lost their pinkish color. They will continue to cook a bit once out of the skillet. Sprinkle salt, pepper and additional thyme on the other side of unseasoned chops.While chops are cooking, peel and slice thinly your apple.Turn chops and let brown on the other side.Remove chops onto a plate.
Make the Sauce: Add apple to skillet and let brown, stirring frequently, let cook for 3-5 minutes, add a little butter if you have to. Add garlic and let cook one minute only, you do not want to burn the garlic. Add port wine carefully to skillet, scrape bottom to remove brown bits. Add onions back to skillet. Let cook for two more minutes.Add bullion paste, and water and let reduce by a half. Add one small pat of butter remaining sauce taste for any need of salt or pepper. Pour mixture over your pork chops and dinner is ready.
Sunday, April 27, 2014
Tips and Recipes for Handy breakfast with bread for busy bugs!!!!!
Hello every one it has been a long I did not make any post on recipes. It is because I am busy with shifting my stuff to a new apartment near to my college and damn thing is that my final exam and assignment were on the same week. So I was busy winding up with all those stuff. Now am free blogging!!!! I started enjoying the scent of freedom!!!
Now coming to the handy breakfast, this delicious treats fills the belly of your hubby, boyfriend or your child who get up early morning and rush to work with empty tummys. I present to you some excellent handy meals that they can have while driving to their destination.
You can make them for lunch box for your kids or husband.
Tip 1: Always keep a pack of fresh bread and half a dozen eggs at home.
1. Handy Mayo Sandwich(For Vegetarians)
Ingredients
Bread 2
mayo-1tbsp
onions very finely chopped-2tbsp
tomato very finely chopped 2 tbsp(remember to remove the juicy middle part when you cut it)
salt pinch
pepper powder pinch

Method:
 Toast the bread for 2min or till it gets golden brown. Mean while take a small mixing bowl and add onions, tomato, salt and pepper, mix all the ingredients together. When the bread is ready, apply this mixture as a layer and cover it with another bread slice. Microwave this sandwich for 30seconds. Wrap it in a aluminium foil and give them to hand. They will enjoy the taste of mayo with crispy bread and onion.
Tip 2: If you do not have mayo then add butter instead.
2. Omlet/ amlet/ Omlette and bread

Ingredients
Eggs 2
Bread slices 2
onions very finely chopped-2tbsp
tomato very finely chopped 2 tbsp(remember to remove the juicy middle part when you cut it)
salt pinch
pepper powder pinch
Cilantro/Coriander leaves finely chopped-1tbsp
Milk 2tbsp
Method
Break open the eggs and whisk them till they become foamy. Add milk and all other ingredients and mix well. Take a pan and heat 2tbsp of oil in it. Make sure that you spread the oil all over the pan and line it with thin coat of oil. Pour the egg mixture on the hot pan like you pour for making omlet. When the amulet starts cooking from the bottom, take your bread and toast it. Now take the toasted bread and press it on the top of the cooking omelet and soak the uncooked egg. now lift the omlet up and place the two bread slices on the pan and flip the omlet on them. Now the uncooked omlet is on top of the bread slices. Cook it under low flame for 2min and turn off the stove. Wrap them in a foil and now the handy break fast is ready. The bread after soaking in the egg and there by cooking will give a very flavorful bite!!!! youll definitely like it!!!!
Keep visiting my blog for more recipes. Thank you!!!
Now coming to the handy breakfast, this delicious treats fills the belly of your hubby, boyfriend or your child who get up early morning and rush to work with empty tummys. I present to you some excellent handy meals that they can have while driving to their destination.
You can make them for lunch box for your kids or husband.
Tip 1: Always keep a pack of fresh bread and half a dozen eggs at home.
1. Handy Mayo Sandwich(For Vegetarians)
Ingredients
Bread 2
mayo-1tbsp
onions very finely chopped-2tbsp
tomato very finely chopped 2 tbsp(remember to remove the juicy middle part when you cut it)
salt pinch
pepper powder pinch
Method:
Tip 2: If you do not have mayo then add butter instead.
2. Omlet/ amlet/ Omlette and bread
Ingredients
Eggs 2
Bread slices 2
onions very finely chopped-2tbsp
tomato very finely chopped 2 tbsp(remember to remove the juicy middle part when you cut it)
salt pinch
pepper powder pinch
Cilantro/Coriander leaves finely chopped-1tbsp
Milk 2tbsp
Method
Break open the eggs and whisk them till they become foamy. Add milk and all other ingredients and mix well. Take a pan and heat 2tbsp of oil in it. Make sure that you spread the oil all over the pan and line it with thin coat of oil. Pour the egg mixture on the hot pan like you pour for making omlet. When the amulet starts cooking from the bottom, take your bread and toast it. Now take the toasted bread and press it on the top of the cooking omelet and soak the uncooked egg. now lift the omlet up and place the two bread slices on the pan and flip the omlet on them. Now the uncooked omlet is on top of the bread slices. Cook it under low flame for 2min and turn off the stove. Wrap them in a foil and now the handy break fast is ready. The bread after soaking in the egg and there by cooking will give a very flavorful bite!!!! youll definitely like it!!!!
Keep visiting my blog for more recipes. Thank you!!!

Saturday, April 26, 2014
Garlic Ginger Bok Choy – Cheap Easy and Fun to Say!
 Bok Choy is becoming very easy to find in grocery stores these days as the trend to eat green veggies continues to grow (for good reason). This is great vegetable for many reasons; it’s cheap, it takes about 3 minutes to cook, it has a beautiful subtle sweet flavor, and of course it’s packed with nutritional goodness. As you’ll see, the best tip for great Bok Choy is how to trim the tops and bottoms separately so they both can cook perfectly.
One quick anecdote before you watch the clip. I was taking roll call on Day 1 in one of my first classes as an instructor at the Culinary Academy, and was going down the list calling out the names and listening for the traditional call back, “here Chef,” when I saw on my roster “Bok Choy.” Well, that’s an interesting name, so I called out the name and heard in a very deep voice, “here Chef.” I looked up to make eye contact, as I did with all the students as I called roll for the first time, and sitting there was this very tall, Scandinavian-looking gentleman with blond curly hair. I asked him if that was his nickname and he said no, that was his real name. Now, the classes at the school were 3 weeks long, and as much as I wanted to, I resisted the temptation to go up and ask this man how he came to get the name Bok Choy. So, Bok Choy, if you are reading this post, please email or comment and tell me how you got the name! It’s been 5 years and I’m still wondering.
Ingredients:
3-4 Heads Of Baby Bok Choy
1/2 Cup Sliced Red Peppers
2 Clove Garlic
1 Tbl Ginger
1/2 Tsp Red Pepper Flakes
1 Tbl Vegetable Oil
1 Tbl Soy Sauce
8 Drops Sesame Oil
Friday, April 25, 2014
KEERAI PARUPPU PORIYAL GREENS STIR FRY WITH LENTILS

This is a stir-fry my mom makes regularly. She uses greens like amaranth or drumstick leaves. This is made as a side dish with rice and any spicy gravies, particularly seafood dishes. The best combination which I like the most is meen kuzmbu, fish fry, and this stir fry made with drumstick leaves. This is also comfort food for my sister and I. Sadly I don’t get drumstick leaves here, which is my favorite, but I did get a chance to taste many different ones like Swiss Chard, collard greens, turnip greens etc. I keep all of them in my freezer and this is very easy to make any side dishes with greens in just minutes. This time I have made this dish with collard greens. Collard greens have a slight bitter taste, so I have used one small tomato. This can be omitted if any other less bitter green like spinach is used.
INGREDIENTS:
1. Collard greens, 1 bunch.
2. Small onions, 2.
3. Tomato, 1.
4. Green chilies, 1-2.
5. Ginger-garlic paste, 1 teaspoon (optional).
6. Mung dhal or green gram, ¼ cup.
7. Mustard seeds, ½ teaspoon.
8. Cumin seeds, ½ teaspoon.
9. Salt as per taste.
PREPARATION:
Precook the dhal until they are cooked but the dhal is still whole and has a bite to it. This can be done either on stove top by cooking the dhal in a pot with enough water to immerse the dhal and cooked for 10-15 or microwave for 10 minutes. Wash the greens and chop it finely. Dice the onions and tomatoes and slit the green chilies into 2. Heat a pan with some oil. When the oil turns hot, add the mustard seeds and let it splutter. Then add the cumin seeds and fry for a few seconds. Now add the diced onions and sauté for a few minutes until the onions turn translucent. Then add the chopped tomatoes, chilies, ginger-garlic paste and keep sautéing until everything is well blended. Add some salt along with the chopped greens and dhal and mix everything well. Cook closed under low flame for 5-10 minutes until the greens are wilted and all the water is absorbed. Serve hot with rice.
A tablespoon of grated coconut can be added after switching off the stove. Even around ½ teaspoon of ground cumin seeds can be added in the end.
Thursday, April 24, 2014
Wishing You a Happy Easter!
I know that Easter is a religious holiday, but for me, itll always be associated with this sweet, shiny, aromatic bread. If you grew up in an Italian-American home, chances are pretty good you enjoyed something similar, but if you havent, you must give this recipe a try! This originally aired back in 2009, and the link below will take you to that post for all the details.
I hope you all have a wonderful weekend, whether youre celebrating Easter, Passover, or just a beautiful spring day. Enjoy!
I hope you all have a wonderful weekend, whether youre celebrating Easter, Passover, or just a beautiful spring day. Enjoy!

Click here to read the original post, watch the how-to video, and get all the ingredients.
Wednesday, April 23, 2014
Kreativ Blogger Award

My dear friend Sangi of Simply delicious-kerala foods have passed me the Kreativ Blogger Award.Thank you so much dear you have always been my earliest and best critic.
The Kreative Blogger Award comes with some rules:-
You must thank the person who has given you the award.
Copy the logo and place it on your blog.
Link the person who has nominated you for the award.
Name 7 things about yourself that people might find interesting.
Nominate 7 other Kreativ bloggers.
Post links to the 7 blogs you nominate.
Leave a comment on which of the blogs to let them know they have been nominated.
Here is a little insight about me
1.I am always on cloud nine.
2.A pretty good Jewellery designer and I have a vast collection.
3.Interested in learning new things and like to try hand on it.
4.Passionate about cooking and food.
5.Love toys (having a good collection)
6.Very attached to mom and hubby.
7.Love to go for endless shopping.
With a slight change i would like to pass this award to following 8 bloggers
Bergamot, Angies recipes, KitchenFlavours, MartinaJ, Bharathy, Jisha, Nags, SJ
Tuesday, April 22, 2014
Mandi Vendakkai Mochai Mandi

This is a Chettinad special curry or side dish (as it can be used as both) which for sure will find its place in all special lunch served in chettinad. As it won’t get spoiled fast it is taken as side dish for picnics. My brother is a big fan of this curry but I have not bothered even to taste that till I myself prepared it. As ladies finger and potato will be seen as pieces along with long green chilies without any color to the gravy, I thought the taste also will also not be great.
For a long time this recipe is due from my side as some of my readers are eager to know about this dish, and I was little hesitant to write about this as I have never prepared this. For my readers sake I got the recipe from my mother and thought I will try 2 or 3 times and when it comes good I will blog the recipe. To my surprise it was awesome in my first trial itself. As I didn’t take the snaps first time, I had to make it again to write about it. This time also I made it very good. My daughter just loved it and started asking me why I never prepared this. Thanks to my readers as I found out another dish which my child loves. Each vegetable in the mandi got all the 3 tastes (salt, sour, hot) and tasted excellent with curd rice and the little gravy in the dish was also excellent.
The main difference in this curry to the other curries we make is that, we use green chilies instead of chili powder for the hot taste. Instead of water we use ‘Arisi Mandi’( the water we get while washing rice) for making the gravy. I guess it is this water which gives so much taste to the gravy. If we prepare this dish on days in which we soak rice for idly we can get thick mandi. (I used just the water taken from 1 ½ cups of rice).
For taking the water, just wash rice once, pour of the water and soak the rice in two cups of water for 5 minutes then drain the water and keep aside.
Mandi it is said can be made using all vegetables but I guess this combination will be the best since I have seen only these vegetables usually .If mochai is not there also no problem.I didnt soak the mochai the previous day,so made the curry without that.There was not much difference in taste

Ingredients
Ladies finger-6
Small onion-20
Garlic-15 pods
Tomato-1
Green chillies-4 to 5
Potato-1
Arisi Mandi-2 cups
Mochai(white one)-a hand full(It should be soaked overnight)
Tamarind-a small piece (as shown in the snap)
If you have Manga vathal soak 5 vathals in hot water and add while adding mochai to the curry. In that case reduce the amount of tamarind used.
Method
Pressure cook mochai for 1 whistle and keep aside. Keep the kadai in the stove. In 2 teaspoon oil season with little mustard, curry leaf and fennel seeds. Add the chilies, chopped onion and garlic pieces and sauté for 2 minutes. Now add the ladies finger and sauté nicely for another 3 minutes. After this add the tomato, mochai and potato pieces, put little turmeric powder and pour 1 ½ cups of Arisi mandi and cook in medium flame. When the potato pieces are cooked add the salt and tamarind soaked in ½ cup of Arisi mandi. Let the mixture boil for 3 minutes after tamarind is added. The curry should be semi solid (neither too watery nor too thick).If you are going to keep it for a day without refrigeration then don’t use tomatoes
Monday, April 21, 2014
SANDRAS RASPBERRY NUTELLA PROFITEROLES Mini Cream Puffs
 |
| These are decadently petite, but so very tasty, which will end up being the hit at any party or gathering... |
Prep. 20 Mins. |
Bake: 22 - 25 Mins.
Posted: by Sandra at:
INGREDIENTS
*Nutella Cream Filling:
1 cup heavy whipping cream
2 tablespoons confectioners’ (powdered sugar)
1/2 cup Nutella
1 teaspoon vanilla extract
**Raspberry Dessert Sauce
1 cup fresh raspberries, or frozen
--(no need to thaw)
2 tablespoons brown sugar
1 tablespoon orange juice
tiny pinch of kosher salt
1 tablespoon cornstarch
½ cup cold water
***Profiteroles (Mini-Cream Puffs):
3/4 cup water
1/4 cup butter
pinch of kosher salt
3/4 cup all-purpose flour
3 eggs, lightly beaten
--Confectioners’ (powder) sugar, for dusting through a fine sieve
METHOD
*Nutella Cream Filling (chill for 1 hour):
Whip the heavy whipping cream in a chilled bowl with chilled beaters of a mixer until fairly stiff peaks form, and slowly add the confectioners’ sugar, and the vanilla until combined. Add the nutella to a separate bowl, and add 1/2 the whipped cream to the bowl with the nutella, and whip until combined. With a spatula, fold in the remaining ½ of whipped cream, and place in refrigerator to chill.
**Raspberry Dessert Sauce:
Combine the raspberries, brown sugar, orange juice, and kosher salt in a cold saucepan. Whisk the cornstarch in a small bowl with the cold water until smooth, and add to saucepan, and then bring to a boil. Reduce to a simmer for about 5 minutes while occasionally stirring, and then strain out seeds it through a fine sieve that has been placed over a small bowl, using a wooden spoon to push all of the sauce through, and then place in refrigerator to chill.
Preheat oven to 375. Spray a mini-muffin pan with baking spray, and set aside. Also, set a cooling rack aside.
***For the Profiteroles (or Mini-Cream Puffs):
In small saucepan combine water, butter and salt; bring to a boil over high heat. Add flour all at once while stirring vigorously with a wooden spoon until mixture leaves sides of pan and forms into a ball. Remove from heat and add the beaten eggs vigorously stirring until smooth and thick. Using small and slightly mounded ice cream scoop (or a tablespoon) place batter into cups. Bake 22-25 for minutes, until medium golden brown on top. Remove from oven and make a small slit ½ way up the sides of each profiterole to release excess steam. Remove profiteroles from pan onto a baking rack and allow to cool (this only takes a few minutes).
Once puffs are cooled, gently cut in half (as in photo), and careful pinch out any obvious large strands of extra dough in bottoms, leaving tops as is. (Be careful not to take out too much or else you’ll expose the bottom.). Spoon or pipe the filling into bottom of profiteroles, and then the sauce, topping with the lids. Place on serving platter, and dust with powdered sugar. – Enjoy!
~~~~~~~~~~~~~~
Tip: To store, place a piece of bread or non-flavored cracker inside an airtight container, and place profiteroles in a single layer.
Sunday, April 20, 2014
Thracian Roasted Eggplant Salad Tunçilik

Roasted eggplant salads are very common in Thrace, where I come from, during the summer. Thrace (Trakya in Turkish) is the northwestern corner or the European part of Turkey. Thrace is a historical and geographical region that spreads over Greece, Bulgaria, and Turkey. The Turkish part is the Eastern Thrace. Eastern Thrace, in years, witnessed major waves of migration--like the two big ones after the Ottoman-Russian war and the Lausanne Treaty--which created the marvelous ethnic, cultural, and culinary mosaic of the region today.
My favorite jewel of this culinary mosaic, Tunçilik, is one of the many different versions of roasted eggplant salad or meze (=appetizer) thats made in the region. Tunçilik is a specialty of the southwestern part of Turkish Thrace around Tekirdağ.

for 6 people
4 eggplants
5-6 big red peppers or banana peppers
2 tomatoes, finely chopped
4 cloves of garlic, minced
6-7 tbsp of vinegar
3-4 tbsp olive oil
salt
1/2 bunch parsley, finely chopped
Theres nothing written in stone. You can use more or less of everything. Whatever you do, make sure you use all the ingredients. Theres no such thing as Tunçilik without parsley, peppers, or tomatoes, or vinegar. Make it less vinegary or more oily or peppery, but have all the ingredients.

-Roast eggplants and peppers on a grill, or in oven at 450F. Roast tomatoes along with eggplants and peppers for 4-5 minutes.
-Let them cool first. Then peel eggplants, peppers, and tomatoes. And seed them.
-Chopped them all finely.
-In a bowl mix crushed garlic, eggplants, peppers, tomatoes, and parsley.
-In a small bowl, mix vinegar, olive oil, and salt. Add this on vegetables.
-Mix well. Taste. If you think you can handle a little more garlic and vinegar, do not hesitate to add more.
-Tunçilik goes well with red meat or poultry, especially if theyre grilled. And do not forget to soak the juice with fresh bread.
One of the readers of the blog, Tash, has made some wonderful suggestions to perfect this recipe (also see Tash comment below). Id like to share them with you:
- After removing the roasted eggplants from the hot ashes, they are cut length wise, salted and kept vertically in a colander for a few minutes to drain. This I am told drains the bitter taste out of eggplants and removes excess moisture for a more consistent texture in the mix.
-Roasted tomatoes and peppers are not always peeled to add texture and smokier taste to the mix. Just brush off the ashes.
-If available Tahini and little lemon juice with a little roasted garlic was sometimes added to the mix.
-I also noticed that lemon juice was omitted if the roasted tomatoes were in the mix.
-Mixing in fresh kaymak (solidified heavy cream) to the basic mix was my favorite version.

Saturday, April 19, 2014
Last Night We Had a Little Lamb
 Once in a while, even though I know it would make a great video, I just cant bring myself to film a meal. Making a video can turn the most enjoyable recipe into a tiring tangle of timers, wires, and angles. Im forced to use a part of the brain thats in charge of "getting the shot," and artistic expression be damned.
Last night was one of those meals. It was truly delicious, and while I didnt film it, guilt forced me to at least photo it, in hopes of inspiring you next time youre trying to decide what to throw on the grill.
Lamb loins were marinated in garlic, fennel seed, and rosemary. A few hours later, they were grilled over charcoal, to a perfectly rosy medium-rare. Finger-sized carrots were roasted tender in a slow oven with a few drips of olive oil, salt, pepper, and a pinch of brown sugar. Split pita bread was filled with fresh mozzarella, and a squeeze of harissa (a spicy North African tomato/chili sauce). These "hot pockets" were grilled over the coals, while the lamb was resting. The slightly crisp, and smoky exterior was a perfect envelope for the warm, gooey cheese. The cold sauce was a simple plain Greek yogurt, spiked with more harissa, lemon, and fresh mint. Enjoy!


Friday, April 18, 2014
Hummus Recipe How to Make Hummus
.JPG) |
| Hummus |
Ingredients
Kabuli Channa / Chickpeas - 1 cup
Garlic cloves - 4 nos
Olive oil - 3 tbsp
Thick curd - 3 tbsp
Lemon juice - 1 tbsp
Sesame seeds - 1 tsp
Salt and Red Chilli powder to taste
.JPG) |
| Hummus |
Method
Soak kabuli channa in water overnight. Next day drain soaked channa and pressure cook until soft and tender. Allow to cool until channa reaches room temperature.
Place curd in a fine strainer, reserve thick curd and discard any water is found.
In a mixer blender add cooked channa, garlic cloves, olive oil, strained thick curd, lemon juice, sesame seeds, required salt and red chilli powder.
Run the mixer until channa is ground to creamy and smooth paste.
Remove hummus to a bowl, make small well in the center and pour 1 tsp olive oil in it or sprinkle little chilli powder on top.
Serve with warm pita chips or with crackers or with thickly cut vegetables.
.JPG) |
| Hummus |
Thursday, April 17, 2014
Acorn Hominy Bread

2 cups hominy; drained
2 tbl sorghum syrup
2 tbl oil
milk; to make loose paste
1/2 cup masa
1/2 cup hominy paste
1/2 cup acorn flour
2 tsp Baking Powder
1/2 tsp Salt
1 pc egg
1 tbl sorghum syrup
1 tbl oil
1/2 tsp pumpkin spice
1 tbl gluten flour
1/2 cup milk
1/2 cup dried cranberries
1. Blend first four (4) ingredients in a blender set at puree until a
smmoth loose paste is accomlished.
2. Mix the remaing ingredients with 1/2 cup of the homony paste and beat
with about 50 to 70 strokes adding more milk if to tight.
Devide into 3x5 oiled (spray) pans bake at preheated oven 375 F for 30
minutes or a tooth pick comes out clean.
Serve with vanilla ice cream drizzle with a huckleberry or blueberry sauce.
Contributor: Burning Tree Native Grill
Yield: 1 small loaf
Wednesday, April 16, 2014
SANDRAS SUPERB SPLIT PEA and HAM SOUP
 |
| This aint yo Mommas Split Pea and Ham Soup... |
Prep: 10 mins.
Cook: Appx. 2 hrs.
INGREDIENTS
-1 (16 oz. pkg.) dried green split peas
-4 cups water
-4 to 6 cups loww-sodium chicken broth
-1 tablespoon cider vinegar
-2 heaping teaspoons brown sugar
-2 cups cooked ham, cubed
--(or 2 *smoked ham hocks, or *ham bone with meat on it, or a ring of smoked sausage)
-1 lg. carrot, scrubbed, and chopped
-2 ribs celery, chopped
-½ yellow onion, diced
-1 russet potato (or sweet potato), peeled and chopped
-1 large garlic clove, minced
-1 bay leaf
-1/8 teaspoon each: dried oregano, basil, and thyme
-1/2 teaspoon freshly ground pepper
--(I do not add any salt due to the saltiness of the ham)
-Dash of hot sauce
METHOD
Spread the dried split peas out on a baking sheet and pick through them; toss any unwanted matter, then rinse in a colander.
In a large dutch oven (or heavy-bottom soup pot), bring split peas, water, broth, cider vinegar, and brown sugar to a boil. Reduce heat, cover, and simmer for 1-1/2 hours; stirring occasionally.
Add remaining ingredients, cover, and simmer for 30 minutes, until vegetables are tender. Remove bay leaf, and toss. Taste for seasoning, and add more broth or water if a thinner consistency is desired.
Serve with hot rolls or slices of French bread. - Enjoy!
~~~~~~~~~~~~~~
*Tip: If using smoked ham hocks or ham bone with meat on it, add at the beginning of the cooking process, and remove after 1-1/2 hours to pull meat from hocks or bone, cube, and return to pot when adding vegetables.
Tuesday, April 15, 2014
TAMARIND CHUTNEY
TAMARIND CHUTNEY

INGREDIENTS
- Tamarind pulp-6 tablespoons
- Water-2 cups
- Sugar-1½ Cups
- Ginger powder-½ teaspoon
- Cumin powder-1 teaspoon
- Garam masala (optional)-1/2 teaspoon
- Red chili powder- ½ teaspoon
- Salt-1 teaspoon
METHOD
- Soak the tamarind in hot water for 20 minutes.
- Place a frying pan over medium heat and add the water, tamarind pulp and sugar.
- Bring the sugar and tamarind to a boil and simmer over a low heat until the mixture becomes shiny and the sugar is completely dissolved.
- Add all the rest of the ingredients and Simmer for 5 minutes.
- Allow it to cool.
- Tamarind chutney is ready to serve.
Ambrosial Thalagam for my 100th post

100
This is my 100th blog post and thats all thanks to my fellow food-blogger friends and readers who have encouraged me, all along the way.
Ive been promising to post the recipe of Chettinad Tomato Paruppu Pacchidi for a while, but then I wanted my 100th post to be something very traditional.
It is Thalagam. Please dont confuse it with a sambhar or a curry. Its neither. But one taste of this and the flavours will get etched in your taste buds forever. I actually made it for the first time last evening with no thoughts about posting this as my 100th. I just followed my craving, called up mom, told her I want to eat Thalagam NOW. Scribbling down the approximations dictated by mother, I set out in pursuit of that perfect taste.
If you are wondering what Thalagam is all about, this is what it is. A medley of vegetables cooked in a paste of roasted red chillies, sesame seeds, mustard seeds, split black gram and grated coconut. A swish of tamarind puree rounds up the bold flavours together. The result is a spicy, mildly sweet, tangy curry offset by the nutty taste of roasted sesame seeds. This almost belongs to the Sambhar family and yet not quite for two reasons. One, it is made on special occasions like Thiruvadirai festival to eat with a sweet floury dish and two, you dont add dal (cooked lentils) in this curry.
I managed to take pictures step-by-step this time. I hope that makes it much easier for you to try out this steeped-in-Tambram-tradition recipe atleast once. Once is enough. After that the taste will pursue you for life, pursue you enough to make this often. I can promise that much.

Ambrosial Thalagam
Ingredients:
2 cups of mixed vegetables (Traditionally yellow pumpkin, sweet potato, carrots, arbi)
1 tsp oil
1/2 cup thin tamarind extract obtained from medium lemon sized ball of tamarind
Salt to taste
For the spice paste:
4 dried red chillies
1 tsp mustard seeds
1 T udad dal (split black gram dal)
4-5 slices of fresh coconut
1/2 tsp fenugreek seeds (Methi)
Roast these ingredients in a spot of oil for a minute or two and keep aside.
1 T sesame seeds- roast this separately as it browns much faster than the other ingredients.
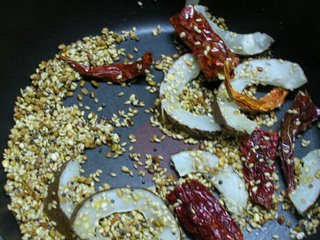
Cooling the roasted ingredients before grinding to a paste

The essence of thalagam - spice paste
Cool the roasted ingredients. Put them in a coffee grinder or mixer and grind to a fine paste with 1/4 cup of water. Keep the paste aside.
Method:
1. In a non-stick pot, heat a tsp of oil. Throw in the vegetables. Saute for a minute. Add 1/2 cup of water to the pot and cover with lid. The vegetables will cook in 10 minutes or so.
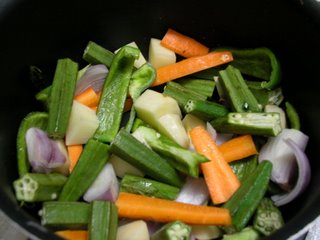
Sauteeing the vegetables (I used these vegetables because I didnt have the traditional ones on hand. Unplanned cooking you see! )
2. Once the vegetables are cooked, add the ground spice paste and the tamarind extract. Put in the required amount of salt, about 1 1/2 tsp, a pinch of turmeric powder to the boiling thalagam.
3. Keep the flame on low, cover the pot with a lid, keep it at a slow simmer for 8-10 minutes so that the vegetables can soak up the flavours of the spices.
4. After 10 minutes, remove from flame and serve with steamed rice or broken wheat.
Note:
I added a small block of jaggery to the thalagam as I was missing the sweet tinge that pumpkin lends to it. Despite not using the traditional vegetables, the taste of this one came very close to what my taste buds remembered from the years.
Tags:
Thalagam, tambram recipes, thiruvadirai, tamil recipes, festival recipes
Chocolate Cake Recipe chocolate frosting recipe

How to make an easy chocolate cake with chocolate frosting recipe
This is a delectable chocolate cake recipe that is simple to bake yet very impressive to serve to family and friends.
Chef uses Belgium milk chocolate to bake a fabulous cake that is filled and covered with a milk chocolate frosting.
The chocolate cake is soft, moist and bouncy like a compact sponge, the frosting is pure milk chocolate silk.
This tasty chocolate cake also has three layers to it baked in three 7 inch cake tins. If you only have two cake tins then this recipe can be make into a chocolate sandwich cake instead, please note two 7 inch tins will be too small so make sure both cake tins are 8 inches wide for a sandwich cake.
If you love milk chocolate and you love cake then you will love this delicious and easy recipe.
To learn how to make Chefs easy chocolate cake recipe simply follow the step by step instructions below and get baking.


Ingredients for chocolate cake
80g / 3oz Margarine
5 medium Eggs (cold from fridge)
275g / 10 oz Plain all purpose flour (1 + 1/2 Cup + 1/4 cup)
6 fl oz Milk
140g / 5oz Milk Belgium chocolate (1 large cup)
2 tsp Bicarbonate of soda
200g / 7oz Soft light brown sugar (1 cup)
1 tsp Vanilla essence
Frosting ingredients
6oz / 180g Milk Belgium chocolate
1 oz Margarine
2 fl oz Milk
190g / 6 + 1/2 oz Powdered sugar
Picture of the centre of a chocolate cake.

Picture of chocolate frosting.

How to make a Triple layer chocolate cake
Use a mixer to cream the margarine and sugar.

Add the five eggs one at a time to the sugar mixture making sure to mix thoroughly between each egg.


Melt the chocolate and leave to slightly cool for a minute or so. Add the chocolate to the egg mixture and mix thoroughly straight away.

Add the milk to the vanilla essence.
Mix the bicarbonate of soda into the flour.
Add parts of the flour and milk a little at a time being sure to mix well between each one.
Mix the bicarbonate of soda into the flour.
Add parts of the flour and milk a little at a time being sure to mix well between each one.


Grease and flour three 7 inch cake tins (or two 8 inch tins).
Pour the chocolate cake batter evenly between each cake tin.
Place into a hot oven at gas mark 4/ 180C for 40 minutes.

Remove from the oven and leave the chocolate cake in the cake tin for 10 minutes before removing the cakes and leaving to fully cool on a wire rack.

Once the chocolate cakes have cooled down make the frosting.
Fill a pan up with a 1/3 of water and place a dish over the top of the pan. Melt the chocolate and margarine together in the dish.
Carefully take the dish from the pan and add the milk and powdered sugar in parts mixing thoroughly in between adding them, it should be done in approximately 3-4 parts.

Use a spoon or spatula to spread the inside of the cake with chocolate frosting, cover the cake in the chocolate frosting.


Leave the cake to settle and set.
Enjoy Chefs delicious chocolate cake recipe.
Enjoy Chefs delicious chocolate cake recipe.


Subscribe to:
Posts (Atom)