Friday, December 27, 2013
The Matrix

Easy Mediterranean Tuna or Salmon Artichoke Pasta
 |
| Easy comfort food- pasta with tuna or salmon. |
The moment I knew my first marriage was failing faster than you could murmur blueberry pancakes on a stick was the minute my moody first husband shoved his untouched plate of tuna noodle casserole across the lemon-waxed bridal table and declared, I'm not eating this crap.
And, oh, in case you're wondering where Husband #2 stands on Keanu?
Dude. He's a major fan. Definitely.
Read more + get the recipe >>
We should Cocoa Apricots

I was looking for something that was quite light so chose this recipe from Rosemary Conleys Low Fat Cookbook. In the book it is a Low Fat chocolate and black cherry pudding but I thought it would work just as well with apricots.


The combination worked really well, the sponge is very light, moist and delicious and dig down to find the soft, sweet, golden apricots.
Garlic Black Pepper and Fennel rubbed Flank Steak with Grilled Oranges aka Party Steak!
 You have to love the flank steak; so easy to cook, almost no trimming, relatively lean, and perfect for a party since it’s slight change in thickness from one end to the other allows for slices of medium rare and medium well off the same piece of meat. This very interesting recipe has something I always appreciate in a dish; it makes its own sauce. As you’ll see in the video recipe, we used the juice from some grilled oranges with the natural juices from the steak to create a fabulous looking, and tasting platter of beef.
  While this dish may appear to be inspired by Italian or Spanish influences (which it is), it’s also a take on one of my favorite Chinese dishes; spicy orange beef. I love to grill flank steak with a highly flavored rub of garlic, fennel, salt and black pepper. I wondered what would happen if I added a little orange to the marinade, and then I got the idea to caramelize some orange halves on the grill, and squeeze the juice over the meat after it was cooked and sliced. It was an amazing combination, and one you must try. I did a recent video recipe with some orange and fennel grilled chicken thighs, that was very good, but this went to a whole new place. Enjoy!
1 flank steak (about 2 pounds)
1 tbl fennel seeds
2 tbl black pepper
2 tsp salt
3 oranges
2 tbl olive oil
4 sprigs rosemary
4 cloves garlic
cayenne pepper to taste
Thursday, December 26, 2013
Vegetable Spring rolls with Indian Flavors
CLICK HERE TO VIEW CALORIE CHART

Ingredients:
Serves:2
Serving size:3
Spring roll sheets: 6
Cabbage finely chopped-1cup
Tofu shreaded-1/4cup(optional)
Carrot shredded-1/2cup
Onion finely chopped-1/2cup
Spring onion- chopped-5
Grated potato-3tbsp
Ginger paste-1tea spoon
garlic paste- tea spoon
Cumin powder-1/2tbsp
pepper powder to taste
Salt to taste
1tbsp of maida/all purpose flour mixed with 2tbsp of water-to stick edges(You can use egg wash if you wish)
oil-1tbsp
Oil for frying spring rolls
Method:
Heat oil in a pan and add all vegetables and cook by closing the pan, keep stirring them in between. when the vegetables are 80% done add ginger, garlic, cumin powder, salt and pepper powder. Addition of soy sauce is optional, if you would like to add 1tbsp should be enough. Mix all the ingredients well and cook in the open pan, allowing all the moisture to escape. The filling should look dry, if there is still any moisture left, keep stirring and cook it on medium flame till it becomes dry. Now take the curry and allow it to cool.
Take the spring roll sheets out of the refrigerator and cover them with a damp cloth, this will help them from drying out. Now take one sheet and put the filling on one corner as shown, roll it tightly and stick the final edge with all purpose flour.
Heat oil in a skillet and fry them under medium heat and enjoy with ketchup/tomato sauce. Generally these spring rolls are deep fried, if you wish you can deep fry them either.
Hope you like my recipe.
Ill post several variations on this spring rolls soon!!!!!!!!!!!!!till then keep visiting my blog.


Creamy Coleslaw
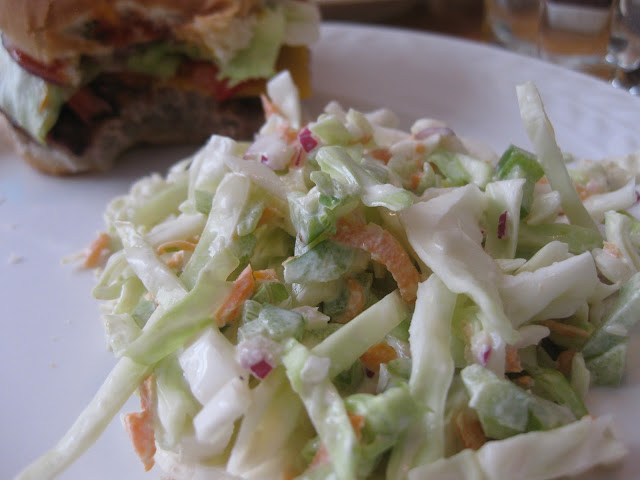
Creamy Coleslaw
Makes a lot, but adjust amounts for your needs
2 1/2 lb. green cabbage, cored and cut into 3" chunks, then finely chopped or shredded
1 medium onion, finely chopped
1 large green bell pepper, finely chopped
1 large carrot, coarsely grated
1 1/4 c. mayonnaise
1/3 c. cider vinegar
2 tsp. sugar
1 tsp. salt
1 tsp. pepper
Toss all vegetables in a large bowl with salt and pepper.
Whisk together mayonnaise, vinegar, and sugar, then toss with slaw. Chill covered, stirring occasionally, for at least 1 hour before serving. (for vegetables to wilt and flavors to blend)
Source: Epicurious
Creamy Tomato Tuna Penne Pasta and the Great Tuna Melt Defense


2/3 cup finely grated Parmigiano-Reggiano cheese, more as needed
View the complete recipe
Wednesday, December 25, 2013
How to Butterfly Stuff Roll and Tie a Pork Roast Like a Celebrity Butcher


5-6 pound boneless pork loin roast, butterflied as shown
Amsterdam Maxi Forcing Carrots

Ive been very resistant to the idea of planting "baby" carrots. My thought is we plant regular carrots and get baby carrots anyway, half the time. I see no benefit in planting carrots, covering them in burlap, watering them, weeding them, thinning them, waiting, waiting - then pulling them up and getting something dinky. Id rather get a nice big, fat carrot.
However, Mr, Ferdzy talked me into trying these, and I have to say Im extremely impressed. We planted them on August 9th, some in our wet bed - thick, sticky clay - and some in our dry beds, which are sandy and quick draining. They both did fabulously. William Dam says they are ready in 45 to 55 days, and they might have been, but we left them much longer (we picked the last on December 4th) and they held very well. Only a couple have split out of hundreds. We also had much less trouble with forking than usual, but thats because we have finally gotten the message: no manure please, were carrots. We were very slack about thinning them, and they just stood there shoulder to shoulder, mostly getting to a perfectly respectable size anyway. They pulled out easily, and while some were on the small side, at about 4 or 5 inches long, some got as long as a foot*, and a good width too, although none were really fat. And sweet! And juicy! And yummy! These are a real winner, and all this in an open-pollinated heirloom carrot.
I wouldnt want to plant them much later than when we did, but it was a good time. Our annual July drought was over, and we were getting some rain. As you may suppose by the planting date, they went in after we had harvested an earlier crop of beets and turnips - two crops from one space, very nice! Next summer we may try these first, with beets and turnips to follow and see how that does, as these would be an excellent summer carrot, as they are so crisp and juicy; delicious raw. William Dam says they store well. We have enough that we should be able to find out.
In spite of the name, which suggests to me Victorian market gardening and a Dutch origin, the earliest references I can find to the Amsterdam forcing carrot as a variety seem to be from 1948. Given the tendency of seed sellers to re-name vegetables if it seems like a profitable idea, these may well be an older variety than that. They may even be Dutch in origin, although they are certainly extremely popular in England. Apparently the Dutch grew many forced vegetables, including carrots, in the latter part of the 18th century, although the practice began to wane in the early 19th century. Holland is also the apparent origin of orange carrots in general; until the 16th century orange carrots were unknown or rare, most being a muddy brown, red, purple or white.
At any rate, I do intend to "force" some of these in the spring; that is, to plant them earlier then normal in our coldframe, and also under one of the plastic hoop-houses. Well see how they do, but I am optimistic. Also, I am not proposing to try growing carrots in pots, but if I were, this is probably the variety I would choose. Certainly they are a good choice for smaller gardens. Or anyone, really - theyre a great carrot.
*Not, admittedly, the ones planted in the clay. But they got long enough, and I did harvest that batch about a month before the others.
SANDRA’S ADDICTIVE BAKED STYLE SMASHED TATERS
 |
These smashed potatoes are insanely delicious and a perfect accompaniment that doesnt require gravy, although if you so choose they’re fabulous that way too... |
TGIGF Thank God it’s Good Friday!
 Well, it’s been a hectic week around my kitchen this week, with beginning some private Chef work, and planning/experimenting for my one big catering event I do every year. I will share more on that in another post. But since I didn’t have time to do much filming this week, it gave me a chance to catch up on a few missing clips that had not been transferred from my old blog. Thanks to all my attentive fans who noticed the Beans and Greens clip that I mentioned in the Prosciutto Wrapped Prawns post wasn’t on the site. Same goes for the Bechamel clip. If you ever watch a clip on this site and I mention another clip that goes along with it, but you don’t see it anywhere, PLEASE let me know. Thanks.
I hope you all enjoy your Easter weekend. Whether you’re a Catholic or not, at least there’s going to be lots of chocolate around, so you’ve got that going for you. I remember growing up, trying to figure out the connection between Jesus rising from the dead, and my father hiding hard-boiled eggs in the bushes behind the house.
Stay turned for a whole week of new clips coming up including my attempt at individual Cheese Soufflés (an idiot proof version…btw, that was an inside joke for one of my viewers), Jerky Chicken (not Chicken Jerky), 12 Second Coleslaw (for real), and the “Perfect” Tuna Melt. One last Easter egg hunt tip for you kids; check the mail box, there’s always an egg hidden in the mailbox. Enjoy. Photo above from Rakka.
Ill leave you with this White House Easter Egg hunt clip. Peggy, this ones for you...
Happy Valentines Day! Six Sexy Supper Ideas for You and Your Sweetie
I hope you all have a great Valentines weekend. Enjoy!


 Mushroom Ragout on Garlic Toast
Seared Top Sirloin Steaks with Pan Jus
Black Pepper Crusted Pork Tenderloin with Black Cherry Reduction
Classic Roast Rack of Lamb with Dijon Gratin
Chicken Marsala a la Ryan’s Cafe
Easy Indoor "Barbecued" Shrimp
Tuesday, December 24, 2013
Cilantro Pesto de Esteban
 |
| Kick up the usual pesto with fresh, citrusy cilantro. |
And Babycakes, you know Im always one to share. But Im not quite ready to write about it. Im still in the thick of it- but finding some help, at last. And the past two days have been better. And so, I thought Id grab my camera and share a new pesto Esteban just whipped up after a quick trip to Wild Oats in Santa Fe today.
Cilantro, it turns out, is not only a cool accompaniment to hot and spicy dishes and coconut milk sauces, it may be good for you. Cilantro is full of antioxidants and (perhaps?) helps the body to detoxify. Folklore has it aiding the liver in detoxification efforts. Whats not to love about that?
Ingredients:
1 cup fresh cilantro leaves- we bought 1 large bunch of cilantro
1 large garlic clove
1/4 cup toasted almonds
1 roasted red pepper
2 ounces Asiago cheese, grated - for vegan and GF/CF, try nutritional yeast
3-4 tablespoons extra virgin olive oil, as needed
Instructions:
Place the cilantro, garlic, almonds, red pepper and Asiago in a food processor bowl; cover and pulse until finely chopped. Begin adding a drizzle of extra virgin olive oil and pulse to combine. Add enough olive oil to make a paste.
Taste test for seasoning or texture adjustments.
Karinas Notes:
- Serve a spoonful of cilantro pesto as a flavorful spike to soups and chili, stir-fries and hummus.
- Slather it on your favorite rice pasta.
- Use it as an appetizer spread with cream cheese and rice crackers.
- Schmear it on a brown rice pizza shell and top it with spicy vegetables and shredded jalapeno pepper cheese.
- Spoon it on a split baked potato and crumble goat cheese on top.
- Use a spoonful to make a salad dressing: just add olive oil, lemon juice, sea salt and fresh ground black pepper; whisk till combined.
- And dont forget quesadillas - this pesto would be fab on a grilled corn tortilla with sliced fresh tomatoes and shredded cheddar or goat cheese.
Okay, now Im getting hungry. Whens lunch?

Rice with Lentils Mercimekli Pilav

This is a recipe that I and my collage roommates made and enjoyed a lot of times in our dorm kitchen. This was the tastiest thing we cooked.
1 1/2 cup white rice
1/2 cup green lentils
1 small onion, finely chopped
3 tbsp olive oil or butter
3 cups of water
salt
-Boil lentils with 3 cups of water on medium for 20-30 minutes or until theyre cooked. Be careful not to overcook them. You dont want them mushy. When theyre cooked, rinse them well and set aside.
-Put oil in a pot and stir onions for 10 minutes.
-Add rice and keep stirring for 3-4 minutes until rice turns into a translucent color. [I used 1 1/2 cups of rice, but you can use as much as you want. Just do not forget that the ratio of rice to water is always 1 to 2]
-Add water and salt. Bring to a boil then turn it to low. Cover and simmer for 5 minutes. Then stir in lentils and cover again. Cook on low until rice soaks all the water (approximately 20 minutes).
-Turn it off and cover the top of the pot with a paper towel or a clean kitchen towel. Place the lid on paper towel and let rice sit for at least 10 minutes before you serve.
-Try it with yogurt.
BEST PIE CRUST EVER !!
This is BY FAR the best crust recipe I have ever made (and Ive made a billion or two). This recipe makes enough pie dough for THREE single crust pies. It is VERY easy to work with and it has a little sugar and vanilla in it, so it has almost a sugar cookie flavor PLUS it is VERY flaky.

PIE CRUST
4 cups all purpose flour
1 3/4 cups BUTTER FLAVOR Crisco shortening
2 tablespoons sugar
1 teaspoon salt
1 large egg
1 teaspoon vanilla
1/2 cup ice cold water
Cut the shortening into the flour with a pastry cutter (or a couple of forks) until the shortening is about half the size of a green pea (seeing small chunks of shortening in the dough is a GOOD thing).
Mix the sugar, salt, egg, vanilla and ice water together, until well mixed, then add it all to the flour-shortening mixture. Work it with your hands until everything comes together in a big ball. Try to do this fairly quickly so that the heat of your hands doesnt melt the shortening. No need to chill this dough, but it handles better if you let it sit covered on the counter for 10-15 minutes before rolling out.
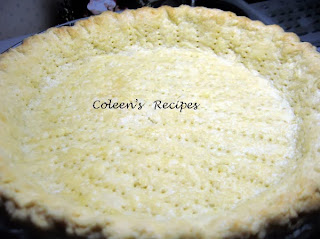
If you are making a single crust pie, roll out a bottom crust, on a floured counter,to fit a 9" pie pan (makes 3). Make sure you dock the pie crust...that just means poke holes in it, like this:

Docking will help your pie crust lay flat as it bakes and you shouldnt get any big "bubbles". Some people use dry beans or raw rice in a foil "bag" to weigh down the pie crust and to keep it from bubbling up, but Ive never done that....your choice.
Bake at 375° for 15-20 minutes or until lightly golden, it should look like this:
If you are making a two crust pie, put the fruit filling into the bottom crust and then brush the edges of the crust with a little egg white that has a few drops of water whisked into it (this will help "glue" the bottom crust to the top crust).
Roll out a top crust, on a floured counter, and lay it over the filled bottom crust. Cut off the extra dough that hangs over the rim of the pie plate. Pinch the top and bottom crust edges together (or use a fork).
After you have pinched the two crusts together, brush the top pie crust with more of the egg white wash (the same that you used to "glue" the edges ) and then sprinkle the whole surface, lightly, with granulated sugar.
Cut several small vent holes in the top crust. Bake in 375° preheated oven for 35 to 45 minutes or until the crust is golden brown (I usually leave it in for 45 minutes).
COOL PIE COMPLETELY BEFORE CUTTING if you want "perfect" slices. If you dont care if your slices are picture perfect, GO FOR IT, theres nothing like warm pie and ice cream.

Single crust or double crust, this is a wonderful pie crust recipe.

NOTE: You can probably use butter instead of shortening, although I have never done it and I have no clue what the result would be.
NOTE: Some people freak out about using shortening, however, shortening is vegetable based and has less calories and cholesterol than butter (plus it "bakes better").

ANOTHER MEMORABLE DATE WITH DEAR ARISHA


11. The Arisha was quite tasty and finished too.


Monday, December 23, 2013
HIWWI DKNY Striped Crew Neck


_W_Z.jpg)
